
Hello, fellow makers! I’m so excited to share a truly unique and whimsical project with you today: my Popping Lizard Coaster. This isn’t just any coaster; it’s a little character that brings a smile to everyone’s face before they even set their mug down!
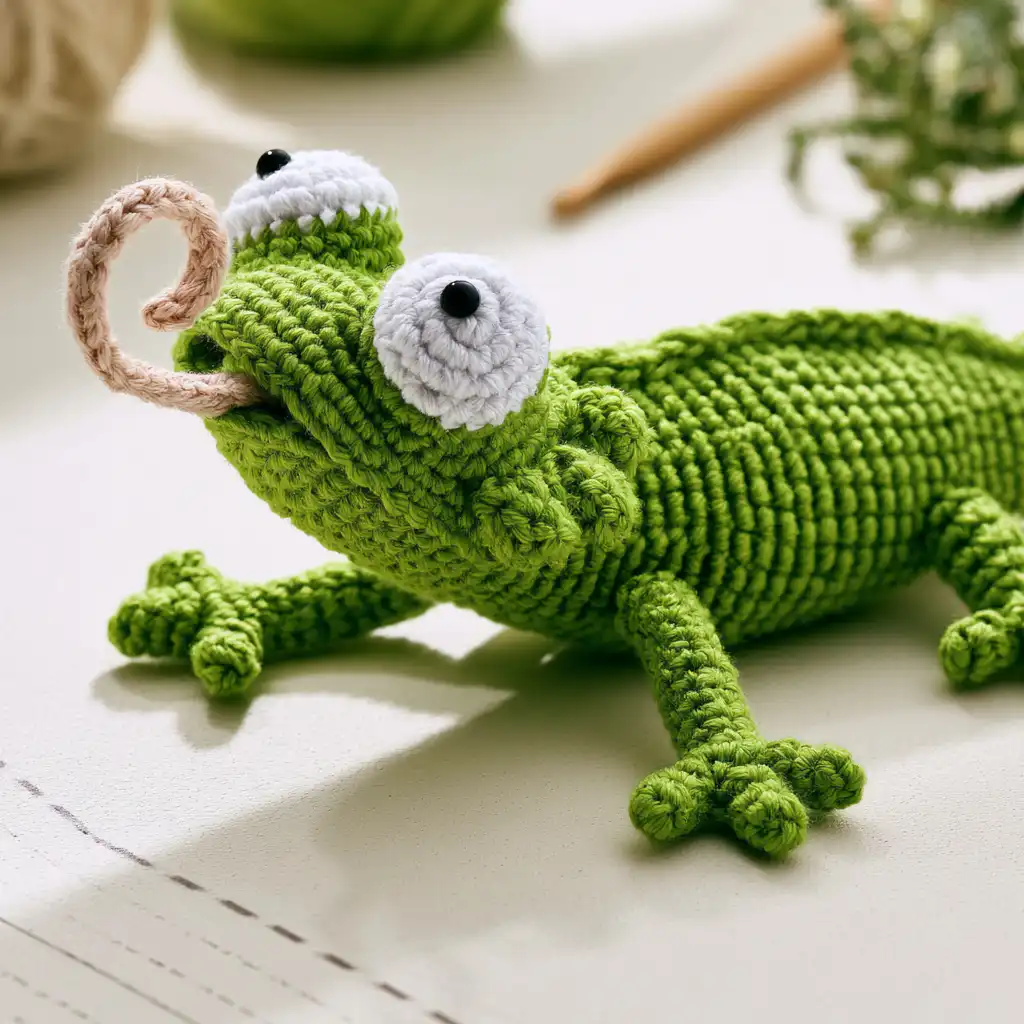
What I love most about this lizard coaster is its blend of practicality and personality. It’s a fantastic way to use up those small bits of yarn in your stash – you know, the ones that are too lovely to throw away but not quite enough for a larger project. With just small amounts of green, white, red, and pink yarn, you can create a charming little reptile that guards your tabletops with a playful grin. It’s also a surprisingly quick make, making it perfect for last-minute gifts or adding a touch of fun to your own home decor.
This pattern focuses on clear, beginner-friendly instructions to construct a round coaster body, which then gets adorned with a long tail, tiny legs, big eyes, and an open mouth complete with a little pink tongue. Everything is worked separately and then assembled, giving you a chance to practice various techniques. If you’re looking for a project that’s both useful and incredibly cute, you’ve found it!
Lizard Coaster Crochet Pattern
Materials
- Small amounts of cotton yarn in green, red, and pink
- Small amount of black yarn or embroidery thread
- Crochet hook to suit your yarn (a medium-weight cotton yarn with a 4mm hook works well)
- Yarn needle
- Scissors
- Stitch marker (optional)
- Safety eyes or black yarn for embroidered eyes
- Hot glue or fabric glue (optional, for securing small parts)
Yarn Information
Cotton yarn is recommended for crochet coasters because it provides a firmer finish and withstands everyday use better than fluffier yarns. If your chosen yarn is thin, you can hold two strands together for the coaster body to give it more structure. A medium-weight cotton yarn with a 4mm hook is a good starting point, but you can adjust your hook size based on your yarn to achieve a tight tension for a firm coaster.
Hook and Tools
- Crochet hook (sized to your yarn, 4mm recommended for medium-weight cotton)
- Yarn needle
- Scissors
- Stitch marker (optional)
- Safety eyes or black embroidery thread
- Hot glue gun or fabric glue (optional)
Abbreviations
This pattern is written in US crochet terms.
- ch – chain
- sl st – slip stitch
- sc – single crochet
- hdc – half double crochet
- dc – double crochet
- inc – increase (work 2 stitches into the same stitch)
- dec – decrease (crochet 2 stitches together)
- st – stitch
- sts – stitches
- rnd – round
- rep – repeat
Pattern Notes
- The main coaster body is worked in joined rounds.
- The tail, head, eyes, and legs are made separately and sewn onto the body.
- The mouth is made in layers, with an upper jaw, lower jaw, red mouth insert, and pink tongue.
- For a coaster that sits nicely under a mug, sew the raised pieces firmly and keep the underside as flat as possible.
Instructions
Main Body
Using green yarn, make a magic ring.
Rnd 1: Ch 3, work 11 dc into the ring. Join with a sl st to the top of the beginning ch 3. Pull ring closed. (12 sts)
Rnd 2: Ch 3, dc in same st, 2 dc in each st around. Join with a sl st to the top of the beginning ch 3. (24 sts)
Rnd 3: Ch 3, dc in same st, dc in next st, *2 dc in next st, dc in next st; rep from * around. Join with a sl st to the top of the beginning ch 3. (36 sts)
Rnd 4: Ch 3, dc in same st, dc in each of next 2 sts, *2 dc in next st, dc in each of next 2 sts; rep from * around. Join with a sl st to the top of the beginning ch 3. (48 sts)
Rnd 5: Ch 1, work reverse sc around the edge. Join with a sl st.
Fasten off and weave in ends.
Tail
Using green yarn, make a magic ring.
Rnd 1: Work 4 sc into the ring. (4 sts)
Rnd 2: *Sc in next st, inc in next st; rep from * around. (6 sts)
Rnd 3: Sc in each st around. (6 sts)
Rnd 4: *Sc in each of next 2 sts, inc in next st; rep from * around. (8 sts)
Rnd 5: *Sc in each of next 3 sts, inc in next st; rep from * around. (10 sts)
Rnd 6: Sc in each st around. (10 sts)
Rnd 7: Sc in each st around. (10 sts)
Rnd 8: *Sc in each of next 3 sts, dec; rep from * around. (8 sts)
Rnd 9: *Sc in each of next 2 sts, dec; rep from * around. (6 sts)
Rnd 10: *Sc in next st, dec; rep from * around. (4 sts)
Fasten off, leaving a long tail for sewing. Work the tail as a continuous spiral rather than joined rounds. Flatten firmly, then sew the Round 10 end (where you fastened off) to the body, leaving the Round 1 magic-ring end free as the tip.
Head
Using green yarn, ch 14. Join with a sl st to the first ch to form a ring, being careful not to twist the chain.
Rnd 1: Ch 1, hdc dec, 10 dc, hdc dec. Join with a sl st. (12 sts)
Rnd 2: Ch 2, dc inc, 2 dc, 6 hdc, 2 dc, dc inc. Join with a sl st. (14 sts)
Rnd 3: Ch 2, 2 dc, 3 hdc, 4 sc, 3 hdc, 2 dc. Join with a sl st. (14 sts)
Do not fasten off. You will now work the upper jaw across the next 8 sts.
Upper Jaw
The upper jaw is worked in rows across 8 stitches of the head.
Row 1: Ch 2, dc inc, 6 dc, dc inc. Turn. (10 sts)
Row 2: Ch 2, dc dec, 6 dc, dc dec. Turn. (8 sts)
Row 3: Ch 2, dc dec, 4 dc, dc dec. Turn. (6 sts)
Row 4: Ch 2, dc dec, 2 dc, dc dec. (4 sts)
Fasten off and weave in the end.
Lower Jaw
Rejoin green yarn to the remaining lower front section of the head, directly underneath the upper jaw.
Row 1: Ch 1, work 6 hdc evenly across the lower jaw stitches. Turn. (6 sts)
Row 2: Ch 1, hdc dec, 2 hdc, hdc dec. (4 sts)
Fasten off and weave in the end.
Inside Mouthpiece
Using red yarn, ch 10. This piece is worked around both sides of the foundation chain to create a small oval insert for the open mouth.
Rnd 1: Starting in the 2nd ch from hook, work 8 sc, 3 sc in the last ch. Working along the opposite side of the foundation chain, work 7 sc, 2 sc in the last ch. Join with a sl st. (20 sts)
Rnd 2: Ch 1, 2 sc in first st, 7 sc, 2 sc in each of next 3 sts, 7 sc, 2 sc in each of last 2 sts. Join with a sl st. (26 sts)
Fasten off, leaving a long tail for sewing. Sew the red mouthpiece inside the open mouth, placing it between the upper and lower jaw.
Tongue
Using pink yarn, attach yarn to the center front of the red mouthpiece. Ch 10. Starting in the 2nd ch from hook, work 9 sc back along the chain. Fasten off and weave in ends. For a forked tongue, you can split the end by adding a tiny ch 2 on each side at the tip, but a simple straight tongue is easier and keeps the coaster less bulky.
Eyes
Make 2. Using white yarn, make a magic ring.
Rnd 1: Work 6 sc into the ring. (6 sts)
Rnd 2: Sc in each st around. (6 sts)
Fasten off, leaving a long tail for sewing. Attach safety eyes before sewing the eye bumps onto the head, or embroider the eyes using black yarn or embroidery thread. If this coaster may be used around young children, embroidered eyes are the safer choice, as tiny safety eyes can be a choking hazard.
Arms and Legs
Make 4. Using green yarn, ch 7.
Starting in the 2nd ch from hook, sl st in each of next 2 chains.
First toe: Ch 3, sl st in the 2nd ch from hook and next ch, then sl st back into the same main chain stitch.
Second toe: Ch 3, sl st in the 2nd ch from hook and next ch, then sl st back into the next main chain stitch.
Work 4 sc along the remaining main chain.
Fasten off, leaving a long tail for sewing. Repeat until you have 4 legs.
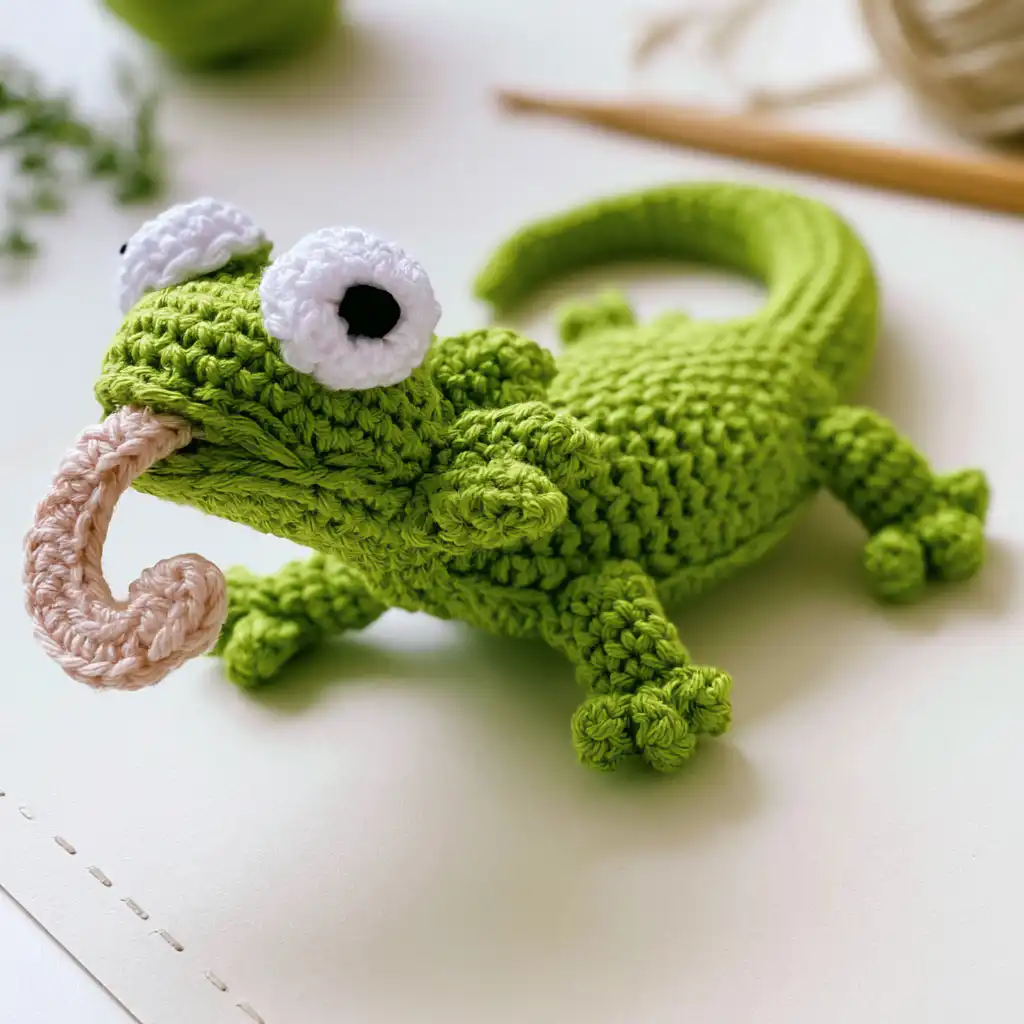
Assembly
Place the main body flat on your work surface.
- Sew the tail to the back or side of the body.
- Sew the head to the opposite side of the body, positioning the open mouth so it faces outward.
- Sew the red mouthpiece inside the mouth.
- Sew or secure the tongue to the center of the mouthpiece.
- Sew the eyes onto the top of the head.
- Sew the legs evenly around the body, with 2 legs on each side.
- Weave in all loose ends.
Finishing
If needed, lightly block the coaster so the body sits flat. A little steam or damp blocking can help smooth the circle, especially if your yarn has been living in the bottom of the stash basket for a while. For a sturdier coaster, you can sew or glue a circle of felt to the back. This helps cover the sewing ends and gives the coaster a neat finished underside.
Olivia’s Tips
This lizard coaster is such a fun project, especially for using up those smaller yarn scraps. One tip I always recommend for projects like this, where you’re joining pieces, is to take your time with the sewing. Neat seams make all the difference in the finished look! Also, don’t be afraid to experiment with colors – while green is classic, imagine a vibrant blue or even a rainbow lizard! These coasters make fantastic gifts, especially when paired with a cute mug and a favorite tea or coffee sachet. They’re a thoughtful, handmade present that doesn’t require a huge time commitment or a lot of yarn. You can even make a set in different shades of green for a garden-themed gift basket, or use bright colors for a more cartoon-style lizard. For another quick and easy coaster project, check out my Crochet a Coaster in Just 20 Minutes post!
FAQ
Here are some frequently asked questions about the Popping Lizard Coaster pattern:
Q: What type of yarn is best for this coaster?
A: Cotton yarn is highly recommended for this project because it provides a firm finish and is durable for coaster use. If your yarn is thinner, you can use two strands held together for the main body.
Q: Can I use safety eyes for the lizard?
A: Yes, you can use small black safety eyes. However, if the coaster will be used around young children, embroidered eyes with black yarn are a safer alternative as safety eyes can be a choking hazard if they come loose.
Q: How can I make the coaster more sturdy?
A: To make your coaster even sturdier and give it a neater finish, you can sew or glue a circle of felt to the back. This also helps cover any visible sewing ends.
Q: Is this pattern suitable for beginners?
A: Yes, this pattern is designed to be beginner-friendly. It uses basic crochet stitches and breaks down the construction into manageable, separate pieces for assembly.