
Hello, fellow crocheters! Today, I’m thrilled to share a project that’s both practical and stylish: a beautiful Mandala Tam Hat. I’ve always loved how versatile these hats are, whether you’re looking to keep your hair neatly tucked away, add a chic accessory to your outfit, or simply want a relaxing make that results in a truly useful item. This pattern is a fresh take on a design I’ve personally enjoyed for years!
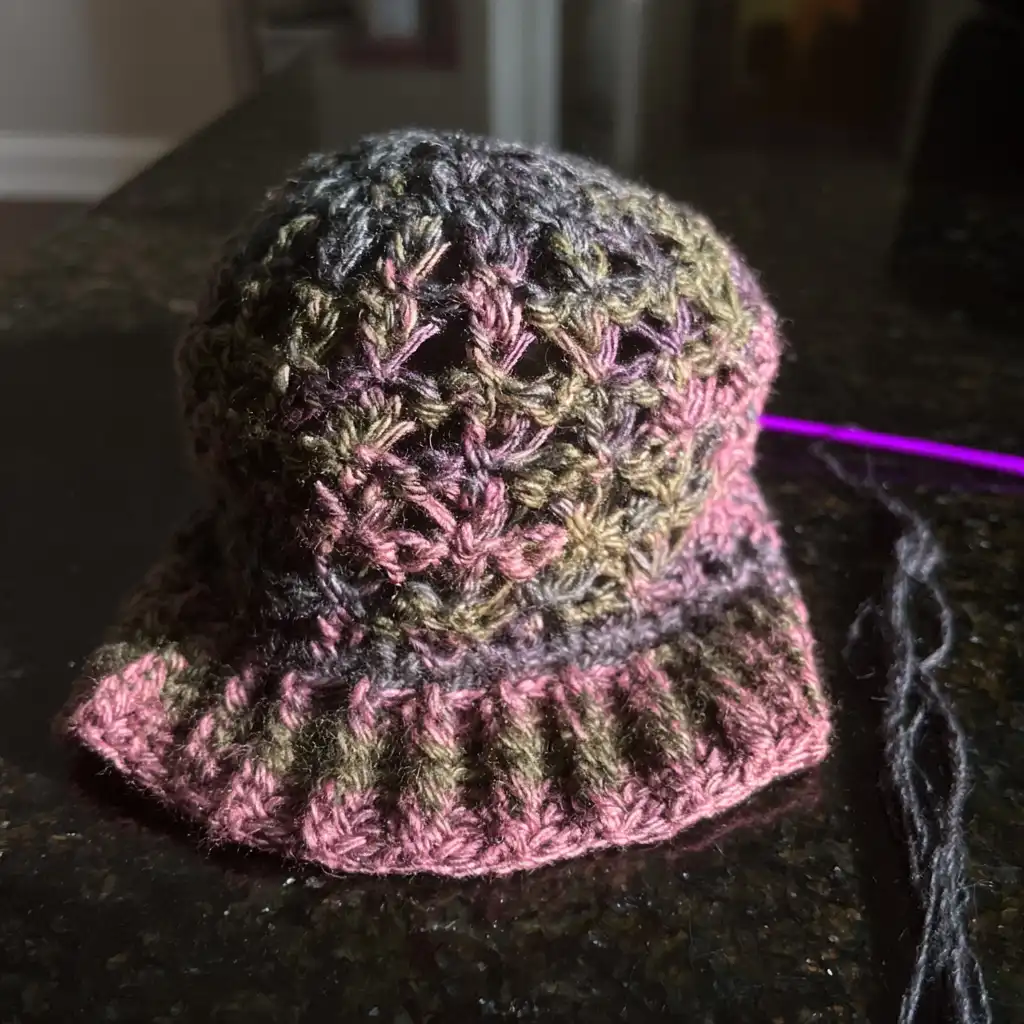
What I particularly love about this Mandala Tam is its unique construction, building up from the center in rounds to create that lovely, expanding mandala effect. It’s worked primarily with mesh stitches, making it relatively quick to crochet while still feeling substantial. The pattern offers two sizes, Small and Large, so you can choose the perfect fit for your hair volume and desired slouchiness. It’s a fantastic project for anyone comfortable with basic stitches and ready to try some mesh work and post stitches.
Mandala Tam Crochet Pattern
Materials
- 5.00 mm crochet hook
- 6.50 mm crochet hook (only if making the optional button & strap decoration)
- Yarn: Any #4 weight yarn, approximately 200 yards.
- Recommended Yarn: Red Heart Unforgettable (#4, 100 g / 270 yds, 100% acrylic) or Lion Brand Landscapes.
- Scissors
- Tapestry needle
Finished Size
This hat design comes in two sizes with the same brim size, but different back lengths to accommodate varying hair volumes:
- Small (Somewhat Slouchy): 22” brim, 8-9” depth, 8” diameter laid flat.
- Large (Very Slouchy): 22” brim, 11-12” depth, 10.5” diameter laid flat.
Yarn Information
- Weight/Category: #4 (Worsted Weight)
- Yardage: Approximately 200 yards
- Recommended Brands: Red Heart Unforgettable (100% acrylic), Lion Brand Landscapes
Hook and Tools
- 5.00 mm crochet hook
- 6.50 mm crochet hook (for optional button and strap)
- Scissors
- Tapestry needle
Abbreviations
- ch — chain
- dc — double crochet
- sc — single crochet
- hdc — half double crochet
- sl st — slip stitch
- ch-sp — chain space
- FPDC — front post double crochet
- BPDC — back post double crochet
- dc3tog — double crochet 3 together
Pattern Notes
- Stitch and row counts are written with changes for the Large size following the Small size, indicated as: small count/row [large count/row].
- Instructions specified for only one size will be noted (e.g., “[Large ONLY]”).
- Where no size changes are specified, counts and instructions apply to all sizes.
- The initial chain in Rnd 1 (Ch 5) counts as an initial chain plus dc + ch 1.
- Ch 3 at the beginning of a round counts as the first dc.
- Ch 2 at the beginning of a post stitch round does NOT count as a stitch.
Gauge
- Main Gauge: 3 ½” in diameter at the end of Rnd 3 (measured edge to edge across the center).
- Post Stitch Gauge: 6 sts = 2” in FPDC/BPDC pattern.
- Always check your gauge and adjust hook size as needed to achieve the listed gauge.
Special Stitches
Post Stitches (FPDC/BPDC):- Front Post Double Crochet (FPDC): Yarn over, insert hook from front to back around the post of the indicated stitch, yarn over, pull up a loop, yarn over, pull through 2 loops, yarn over, pull through remaining 2 loops.
- Back Post Double Crochet (BPDC): Yarn over, insert hook from back to front around the post of the indicated stitch, yarn over, pull up a loop, yarn over, pull through 2 loops, yarn over, pull through remaining 2 loops.
Chain and Stitch Join: A technique combining chain stitches and regular crochet stitches to form the last loop of a mesh round. This pattern uses a ch-2 and hdc into the first sc of the round to create a ch-4/ch-5 sized loop with the hook positioned at the middle of the space.
Double Crochet 3 Together (dc3tog): Yarn over, insert hook into stitch, yarn over, pull up a loop, yarn over, pull through 2 loops (2 loops on hook). Yarn over, insert hook into next stitch, yarn over, pull up a loop, yarn over, pull through 2 loops (3 loops on hook). Yarn over, insert hook into next stitch, yarn over, pull up a loop, yarn over, pull through 2 loops (4 loops on hook). Yarn over, pull through all 4 loops on hook.
Instructions
To Begin: With 5.0 mm hook, Ch 5 (counts as initial chain, plus dc + ch 1)
Round 1: (Dc, ch 1) 11 times into the 5th ch from the hook. Join with a sl stitch into the 3rd ch of beginning ch4. (12 dc, 12 ch-1 sps)
Round 2: (Sc into the next ch-1 space, ch 4) 11 times. Sc into the next ch-1 space, ch 2. Hdc into the first sc of the round. (12 loops)
Round 3: Sc in the same space, ch 4. (Sc in the next ch-4 space, ch 4) 10 times. Sc in the next ch-4 space, ch 2. Hdc in the first sc of the round. (12 loops)
Round 4: Ch 3 (counts as first dc). Dc in the same space, ch 4. (2 dc in the next ch-4 space, ch 4) 10 times. 2 dc in the next ch-4 space, ch 2, hdc in the 3rd chain of beg ch-3. (24 dc, 12 ch-4 sps)
Round 5 [Large Size ONLY]: Ch 3 (counts as first dc). Dc in the same space 2 times, ch 4. (3 dc in the next ch-4 space, ch 4) 10 times. 3 dc in the next ch-4 space, ch 1, dc in the 3rd ch of beg ch-3. (36 dc, 12 ch-4 spaces)
Round 5 [6]: Sc in the same space, ch 5. (Sc in the next ch-4 space, ch 5, sc in the same space, ch 5. Sc in the next ch-4 space, ch 5) 5 times. Sc in the next ch-4 space, ch 5, sc in the same space, ch 2. Dc in the first sc of the round. (18 ch-5 loops)
Round 6 [7]: Sc in the same space, ch 5. (Sc in the next ch-5 space, ch 5) 16 times. Sc in the next ch-5 space, ch 2. Dc in the first sc of the round. (18 ch-5 loops)
Rounds 7-9 [Small ONLY]: Repeat Round 6. (18 ch loops)
Round 8 [Large ONLY]: Sc in the same space, ch 5. (Sc in the next ch-5 space, ch 5, sc in the same space, ch 5. Sc in the next ch-5 space, ch 5) 8 times. Sc in the next ch-5 space, ch 5, sc in the same space, ch 2. Dc in the first sc of the round. (27 ch-5 loops)
Rounds 9-11 [Large ONLY]: Sc in the same space, ch 5. (Sc in the next ch-5 space, ch 5) 25 times. Sc in the next ch-5 space, ch 2. Dc in the first sc of the round. (27 ch loops)
At the end of Rnd 8, the diameter should be about 8” for Small and 9” for Large.
Round 10 [12]: Sc in the same space, ch 4. (Sc in the next chain space, ch 4) 16 [25] times. Sc in the next chain space, ch 1, dc in the first sc of the round. (18 [27] ch-4 loops)
Rounds 11-13 [13-15]: Repeat Round 10 [12].
Round 14 [16]: Sc in the same space, ch 3. (Sc in the next chain space, ch 3) 16 [25] times. Sc in the next chain space, ch 1, hdc in the first sc of the round. (18 [27] ch-3 loops)
Round 15 [17]: Repeat Round 14 [16].
Round 16 [Small ONLY]: Ch 3 (counts as first dc). Dc in the same sp. (Dc in the next sc, 3 dc in the next ch-3 space) 17 times. Dc in the next sc, 1 dc in the next chain space. Join with a sl stitch to the 3rd ch of beg ch-3. (72 Dc)
Round 18 [Large ONLY]: Ch 3 (counts as first dc). Dc in the same sp. (3 dc in the next ch space, 2 dc in the next ch space) 13 times. 1 dc in the next ch space, the first space of the round. (68 Dc)
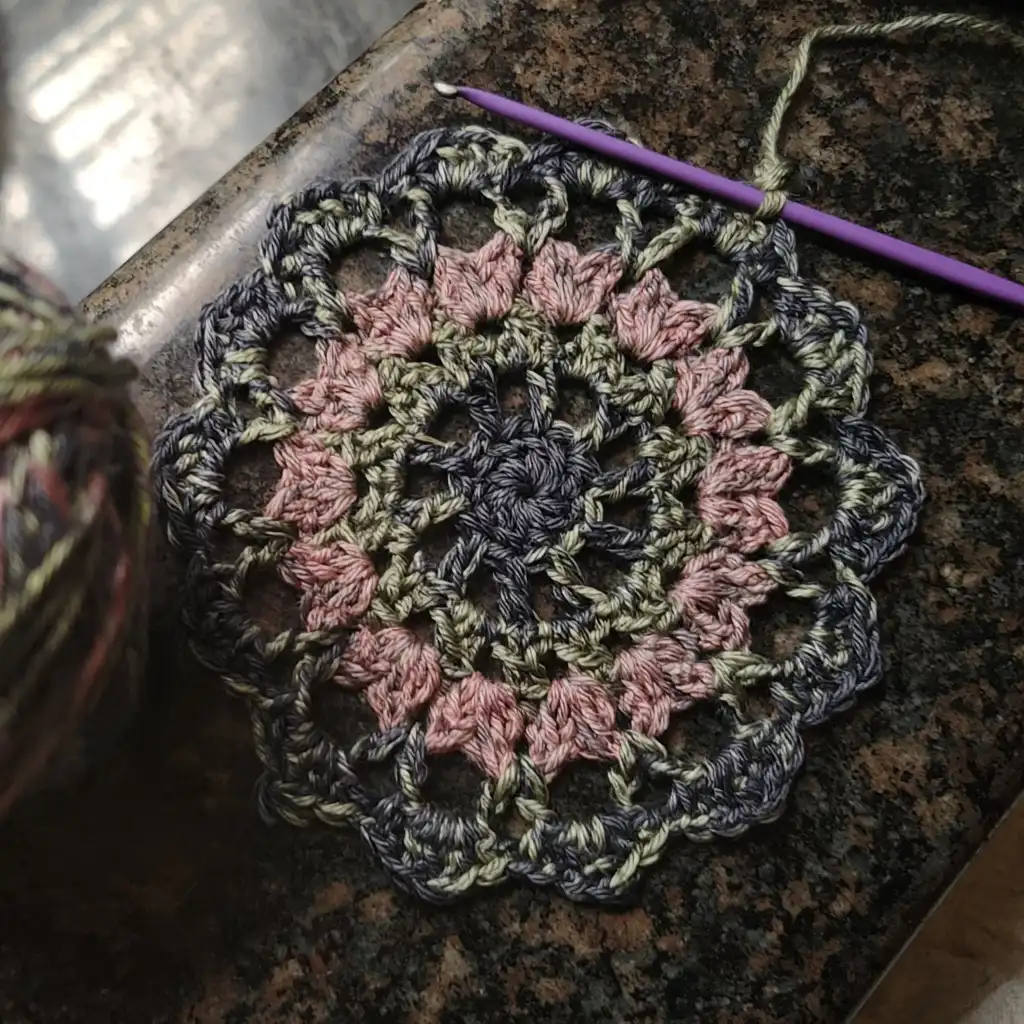
Round 17 [19]: Ch 2 (does not count as first dc), FPDC in the same stitch. 1 FPDC in each of the next 2 sts. (1 BPDC in each of the next 3 sts, 1 FPDC in each of the next 3 sts) 11 times. [Small ONLY: 1 BPDC in each of the next 3 sts.] [Large ONLY: 1 FPDC in each of the next 2 sts.] Join with a sl st in the top of the first FPDC of the round.
Round 18 [20]: Repeat Round 17 [19].
Round 19 [21]: Sc in each stitch around. Note: If the hat brim is too loose, substitute a slip stitch in place of the single crochet, or sl st as an additional row after the sc row is complete.
Finishing
Cut yarn and tie off, leaving a long tail for sewing if you’re adding a button. Weave in all remaining ends.
Assembly (Optional Button & Strap Accent)
If you choose to add a button and strap for extra style and adjustability:
- Attach Button: Position the button over the join stitches where the beginning and end of the last round meet. Sew it on using the yarn tail you left from finishing the hat.
- Create Strap: With a 6.50 mm hook, join new yarn into the side of the post stitches 15 stitches away from the button.
- Row 1: 2 dc in the side of the first stitch, 1 dc in the side of the next st, 1 dc in the side of the next st. (4 dc)
- Rows 2-4: Ch 3, turn. Dc in the next 4 stitches. (4 dc)
- Row 5: Ch 3, turn. Dc3tog over the next 3 sts. Dc in the last st. (2 sts)
- Row 6: Turn without chaining, slip st in the next 2 sts.
- Cut yarn and tie off. Weave in all ends.
- Use Strap: The spaces between the double crochet stitches on the strap can be used to slip over your button and tighten the hat as necessary.
Olivia’s Tips
This Mandala Tam is such a joy to make, and here are a few tips to help you along:
- Consistent Tension: With mesh patterns like this, maintaining consistent tension is key to achieving that beautiful, even drape. Take breaks if your hands start to tire!
- Stitch Markers are Your Friends: Especially in the earlier rounds where increases happen, using a stitch marker to mark the first stitch of each round can save you a lot of counting and frustration.
- Checking Gauge: Don’t skip the gauge check, especially for the main gauge at Rnd 3. It ensures your hat will turn out the correct size and depth. If your gauge is off, try a different hook size.
- Yarn Choice: The recommended yarns, Red Heart Unforgettable and Lion Brand Landscapes, are known for their beautiful colorways and drape. Using a similar #4 weight yarn will give you a comparable result.
- Blocking: While not strictly necessary, a gentle block can really open up the mesh stitches and enhance the mandala shape of the hat.
- Customizing the Brim: If you find the brim too loose after completing the final single crochet round, the pattern suggests substituting with slip stitches or adding an additional slip stitch row. This is a great way to personalize the fit!
FAQ
Q: What does “ch-sp” mean in a crochet pattern?
A: “Ch-sp” is an abbreviation for “chain space,” which refers to the space created by a chain stitch or a series of chain stitches in a previous row or round. You typically work your stitches into this space rather than into the individual chain stitches.
Q: Can I use a different weight of yarn for this pattern?
A: This pattern is designed for #4 weight yarn. While you could try a different weight, it would significantly alter the finished size and drape of the hat. If you do, be sure to check your gauge carefully and be prepared for potential size adjustments.
Q: What is the purpose of the optional button and strap?
A: The optional button and strap accent serve two purposes: they add a decorative touch to your hat, and they allow you to adjust the tightness of the brim for a more secure and customized fit.
Q: How do I choose between the Small and Large sizes?
A: The Small size offers a somewhat slouchy fit with an 8-9 inch depth, while the Large size provides a very slouchy fit with an 11-12 inch depth. Consider how much hair you’d like to tuck into the hat and your desired level of slouchiness when making your choice.