
There’s something so magical about decorating for the holidays, and a handmade touch always makes it extra special. This year, I’m so excited to share a project that will add a truly unique and festive flair to your Christmas tree: a stunning star-shaped crochet tree skirt!
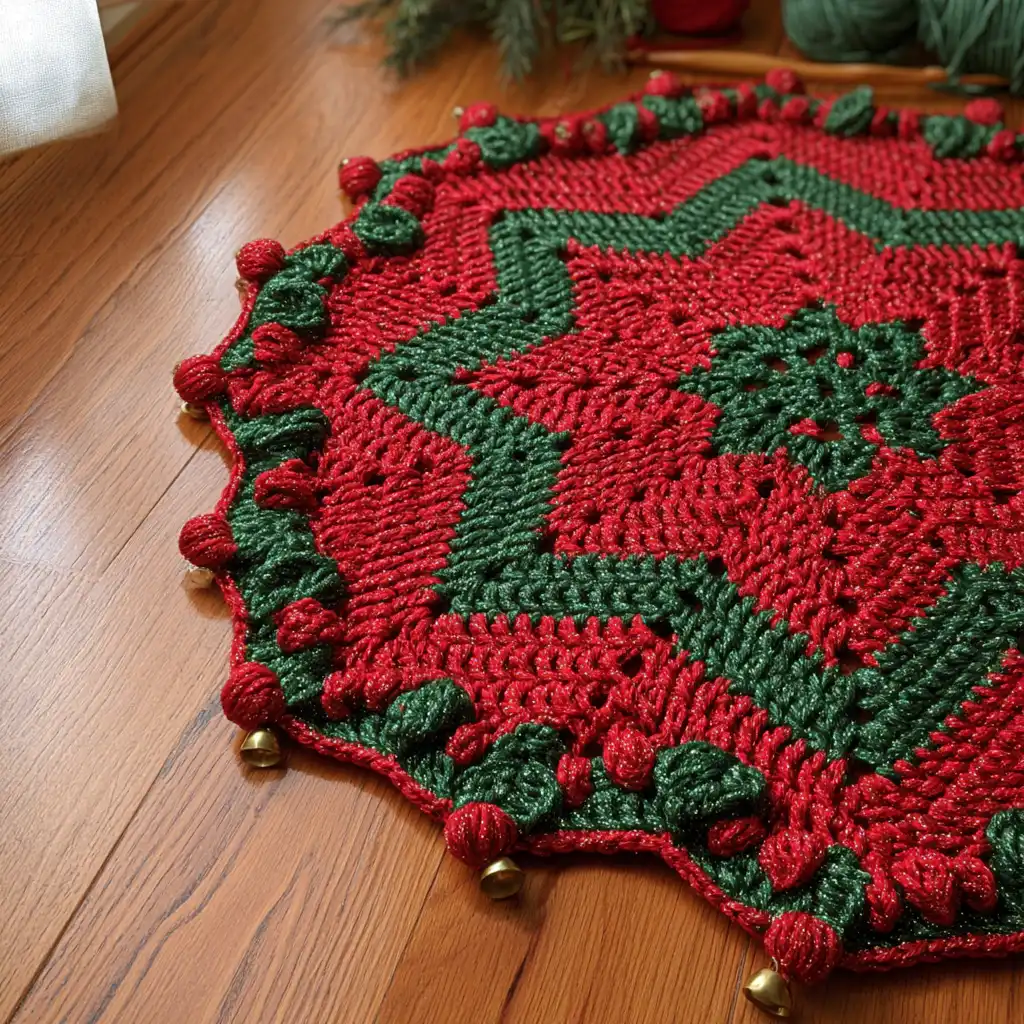
I absolutely adore how this tree skirt comes together. It’s an adaptation of a popular blanket pattern, reimagined to create a beautiful, slightly-more-than-circular star with 17 points. The opening allows it to wrap perfectly around your tree, making it both practical and gorgeous. It looks much more intricate than it is, making it a satisfying project for crocheters of all levels. Imagine the joy of seeing your tree adorned with this festive, handmade piece!
This pattern is designed to be easy to follow, using worsted weight yarn in classic holiday colors. It works up to approximately 48 inches across, which is a lovely size for most trees, and it’s also easy to resize if you prefer a larger or smaller skirt. We’ll be working in rows to build up the beautiful star shape, creating a piece that will become a cherished part of your holiday traditions for years to come.
Christmas Tree Skirt Crochet Pattern
Materials
- Yarn: 2200 yards of #4 Worsted Weight Yarn in Holiday colors (more of colors A and B for a larger tree skirt)
- Shown in: Color A: Big Twist Twinkle Red, Color B: Big Twist Twinkle Green (three skeins of each)
- Optional: 16 mm jingle bells (16 or more if you want more jingle)
- Hook: Furls Streamline Size I (6 mm)
- Additional hook: .5 mm larger on hand in case of curling or tight tension
- Scissors
- Tapestry needle
Finished Size
Approximately 48 inches across.
Yarn Information
- Weight: #4 Worsted Weight
- Brand/Name: Big Twist Twinkle (Red and Green used for sample)
- Yardage: Approximately 2200 yards total
- Skeins: Three skeins of Color A, three skeins of Color B (as shown)
Hook and Tools
- Crochet Hook: US I / 6 mm
- Additional Hook: 6.5 mm (or .5 mm larger than main hook)
- Stitch markers (optional, but helpful for tracking repeats)
- Scissors
- Tapestry needle
Abbreviations
- bet — between
- ch — chain
- dc — double crochet
- dc3tog — double crochet 3 together cluster
- dc5tog — double crochet 5 together cluster
- rsc — reverse single crochet
- sc — single crochet
- sl st — slip stitch
- sp(s) — space or spaces
- st(s) — stitch(es)
- yo — yarn over
Pattern Notes
- This pattern is an adaptation of the 6-Day Superstar Blanket.
- The tree skirt has 17 points.
- The row numbers correspond to the original 6-Day Kid Blanket pattern for consistency across variations. Cluster rows are always Row/Round 2 and 3, dc rows are Row/Round 5 and 6, and sc rows are Row/Round 4 and 7.
- Color changes are given for the pictured stripes (Vivid Chevrons), but you can stripe your skirt any way you like.
- Work into the stitch below the turning chain unless directed otherwise.
- If your tension is tight, be prepared to increase your hook size as noted in the pattern to prevent curling.
Gauge
13 stitches and 14 rows in single crochet (sc) over 4 inches.
Special Stitches
dc3tog (cluster): This stitch is a cluster, not a decrease. Yo, pull up a loop, pull through two loops, *yo, pull up a loop IN THE SAME STITCH/SPACE, pull through two loops, repeat from *, yo and pull through all loops on the hook. dc3tog complete.
dc5tog (cluster): Worked the same as dc3tog, pulling up a loop and pulling through two loops five times before pulling through all loops on the hook.
Instructions
To Begin:
With Color A, ch 35.
Turn.
Setup Row 1: Starting from 2nd ch from hook, sc across. Turn.
Set-up Row 2: Ch 2, dc in same st, *ch 3, 2 dc, ch 1, 2 dc, repeat from * to last sc, ch 3, dc in last sc. (9 ch-3 sps and 8 ch-1 sps. Note: 2 dc are NOT made in the same st.) Turn.
Set-up Row 3: Ch 3, [3 dc, ch 3, 3 dc] in ch-3 sp. *dc3tog in ch-1 sp, [3 dc, ch 3, 3 dc] in ch-3 sp, repeat from * across, dc in top of turning chain. Turn.
Set-up Row 4: Ch 3, *[3 dc, ch 3, 3 dc] in ch-3 sp, dc3tog in next 2 sps, repeat from * to last peak, [3 dc, ch 3, 3 dc] in last ch-3 sp, dc in turning ch. Turn.
Set-Up Row 5: Ch 1, sc in same st, sk 1, sc in each st across, working 3 sc in ch-3 sps, repeat to last 2 sts, sk 1, sc in turning ch. Turn.
Change to Color B.
Set Up Row 6: Ch 3 (counts as dc), counting the st under your ch, sk 2, 2 dc, *[5 dc in center sc from row below], 4 dc, sk 2, 4 dc, repeat from * to last peak, [5 dc in center sc from row below], 2 dc, sk 1, dc in last sc. Turn.
Set Up Row 7: Ch 3 (counts as dc), counting the st under your ch, sk 2, 3 dc, *[5 dc in center dc from row below], 5 dc, sk 2, 5 dc, repeat from * to last peak, [5 dc in center dc from row below], 3 dc, sk 1, dc in turning ch. Turn.
Change to Color A.
(If your tension is at all tight, increase hook size before the next row.)
Set-up Row 8: Ch 1, sc in same st, sk 1, 4 sc, *3 sc in center of 5 dc from the row below, 6 sc, ch 3, sk 2 sts, 6 sc, repeat from * to last peak, 3 sc in center dc, 4 sc, sk 1, sc in turning ch. Turn.
Set-up Row 9: Ch 4 (counts as dc and ch 1), counting the st under your ch, sk 3, dc3tog cluster in next st, *sk 2, [3 dc, ch 3, 3 dc] in center sc from row below, sk 2, dc3tog, sk 4, [3 dc, ch 3, 3 dc] in ch-3 sp, sk 4, dc3tog in next st, repeat from * to last peak, [3 dc, ch 3, 3 dc] in center sc, sk 2, dc3tog in next st, sk 2, dc in last st. Turn.
Set-up Row 10: Ch 3 (counts as dc), sk sp between last dc and dc3tog, *dc3tog in next sp, [3 dc, ch 3, 3 dc] in ch-3 sp, dc3tog in next 2 sps, repeat from * to last peak, [3 dc, ch 3, 3 dc] in ch-3 sp, dc3tog in next sp, dc in turning ch. Turn.
Proceed to Row 4. You will be guided to work the rows in the proper order; don’t overthink or be thrown off by the change in the numerical sequence. Trust the pattern, it works!
Row 4: Ch 1, sc in same sp, 4 sc, *3 sc in ch-3 sp, 8 sc, repeat from * to last ch-3 sp, 3 sc in ch-3 sp, 4 sc, sc in turning ch. Turn. (On subsequent sc rounds, the number of scs between the peaks will increase by 6. The numbers in parentheses in later rows show the number of scs on each subsequent repeat of the pattern.)
Change to Color B.
Row 5: Ch 3 (counts as dc), counting the st under your ch, sk 2, 4 dc, *[5 dc in center sc from row below], 4 dc, sk 2, 4 dc, repeat from * to last peak, 5 dc in center sc, 4 dc, sk 1, dc in last st. Turn. (On subsequent rounds 5 and 6, the number of dcs on either side of the mountain will increase by 3. The numbers in parentheses show the number of dcs on each subsequent repeat of the pattern.)
Row 6: Ch 3 (counts as dc), counting the st under your ch, sk 2, 5 dc, *[5 dc in center dc from row below], 5 dc, sk 2, 5 dc, repeat from * to last peak, 5 dc in center sc, 5 dc, sk 1, dc in turning ch. Turn.
Change to Color A.
Row 7: Ch 1, sc in same st and each st across, making 2 sc in each center of 5 dc from the row below, sc in turning ch. Turn. (You should have 8 sc on each end, 2 sc in each peak, and 14 sc between the peaks on the first repeat.)
Proceed to Row 2. You will be guided to work the rows in the proper order; don’t let the numbers throw you off or overthink a change in the sequence. Trust the pattern, it works!
Row 2: Ch 4 (counts as dc and ch 1), counting the st under your ch, sk 3, dc3tog in next st, *[sk 2, 3 dc in next st], repeat from * to peak [3 dc, ch 3, 3 dc] in second of 2 sc from row below, **[sk 2, 3 dc in next st], repeat from ** to 5th stitch before the center valley st, making last 3 dc in the 5th stitch before the center valley st, sk 4, dc3tog in the center valley st, sk 4, 3 dc in next st, repeat from * to last peak, [3 dc, ch 3, 3 dc] in second of 2 sc from row below, repeat [sk 2, 3 dc in next st] to end, working the last dc3tog in the third sc from the end of the row, sk 1, dc in last st. Turn. NOTE: the first time you work this row, there will only be one group of 3 dc between the peak and the dc3tog in the center of the valley.
Row 3: Ch 4 (counts as dc and ch 1), sk sp between turning ch and dc3tog, dc3tog in next sp, *3 dc in each sp to peak, [3 dc, ch 3, 3 dc] in ch-3 sp, 3 dc in each sp, to the valley, dc3tog in sps before and after the dc3tog in Row 2, repeat from * to end, make last dc3tog in sp before the last dc3tog in the row below, dc in turning ch sp. Turn.
Repeat Row (4, 5, 6, 7, 2, 3) in that order two more times or until the skirt reaches the desired size.
Repeat Row 4. Do not fasten off.
Finishing
Edge
At the end of your last Row 4, make 3 sc in the last stitch. Begin working down the sides of your rows to finish off the opening of the skirt. Use the turning chains, the sc, and dc stitches as foundation chains, working under 2 threads of each stitch and leaving one thread below.
There is no set rule for how many stitches you should put into the side of each stitch. Do what works for your tension. Lay your work down often and check to make sure that your edge does not ruffle (too many stitches) or pull (too few).
When you get to the corner where the side edge meets your starting ch, work 3 sc in first st, work across the bottom of your starting ch and put 3 sc in the last st. Continue working up the side of your rows working sc into the stitches as before. Fasten off.
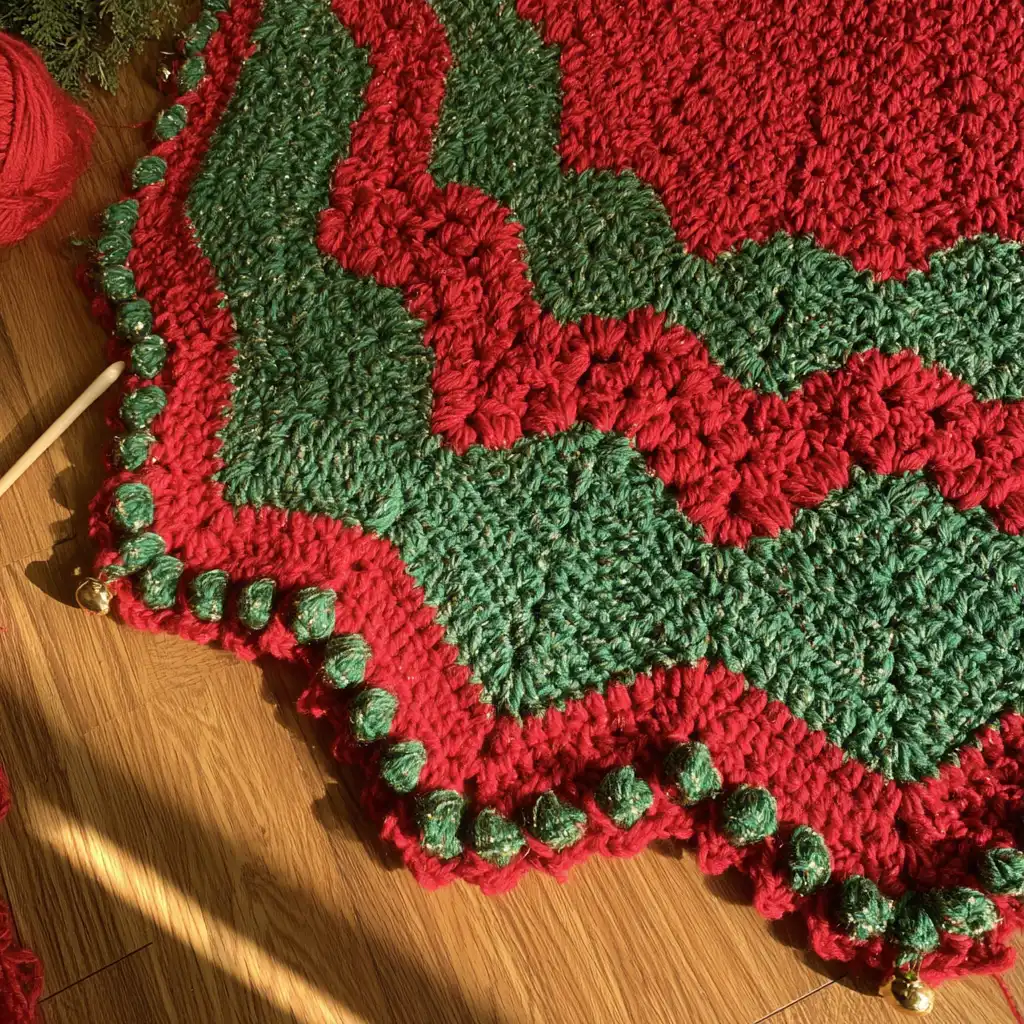
Candy Cane Pom Pom Border
Join Color A with standing sc to first stitch of the edge.
- *Ch 6, dc5tog in 3rd ch from the hook, sl st into same ch. Ch 3, sk 1, sc into next st. Drop Color A from your hook.
- With Color B (join with standing sc to the skipped sc on first repeat) ch 3, working behind Color A sc in next sc.
- Pick up Color A, ch 3, working behind Color B sc in next st. Drop Color A.
- Pick up Color B, ch 6, dc5tog in 3rd ch from the hook, sl st into same ch. Ch 3, working behind Color A, sc into next st.
- Pick up Color A, ch 3, working behind Color B sc in next st. Drop Color A.
- Pick up Color B, ch 3, working behind Color A sc in next st. Drop Color B.
- Pick up Color A, repeat from * to end.
Hints for working the Candy Cane Pom Pom Border:
- Be prepared. It takes forever.
- Take time to lay your work down often and check for ruffling. If your edge ruffles, you should skip a stitch every 5 or even 3 stitches to keep your work flat.
- Your yarn will twist if you don’t take measures to untwist it. I suggest keeping the ball of Color A stationary, and move the ball of Color B under or over Color A every time you use it. If you don’t you will have to stop occasionally and untwist your yarns.
Fasten off. Sew bells at each point. Weave in all ends.
Olivia’s Tips
Working on a project this size can be so rewarding! To keep everything running smoothly, I always recommend using stitch markers at the beginning and end of rows, especially when the stitch counts vary or you’re working complex repeats. It really helps keep track. For this pattern, paying attention to your tension is key, particularly with the cluster stitches and when you switch hook sizes. If you find your edges curling, don’t hesitate to use that slightly larger hook! It can make all the difference for a beautifully flat tree skirt. And don’t forget to take breaks while working on the border—it’s a bit of a marathon, but the result is absolutely stunning!
FAQ
Q: Can I make this tree skirt larger or smaller?
A: Yes, the pattern is noted as easy to resize. You can repeat the sequence of rows (4, 5, 6, 7, 2, 3) more or fewer times to achieve your desired diameter before working the edging.
Q: What kind of yarn should I use for this project?
A: The pattern calls for #4 Worsted Weight Yarn. You can choose any fiber content you prefer, but using a yarn with good stitch definition will highlight the star points and texture beautifully.
Q: Why are the row numbers out of sequence (e.g., going from Row 7 to Row 2)?
A: The row numbering is designed to be consistent with the original 6-Day Kid Blanket pattern variations. This system makes it easier to adapt different stitch patterns, so just follow the instructions as written, and the pattern will work out correctly.
Q: How do I prevent my yarn from twisting when working the Candy Cane Pom Pom Border?
A: To minimize twisting, keep one ball of yarn stationary and consistently move the other ball (either over or under the stationary one) each time you switch colors. This careful management will save you from frequent untwisting breaks.